Material Maker
Creating custom shader generators with Material Maker
Here is a small guide that shows how to create new GLSL-based texture generators. Please don't hesitate to ask questions in comments so I can update it.
First, let's clarify about the shader language. Material Maker is based on the (absolutely fantastic) Godot Engine, that has its own shader language (described here) that is pretty close to GLSL. That's why I generally test shaders in Shadertoy first, then copy the code into Material Maker and adapt it.
Under the hood...
Before creating a new generator, it is important to understand how Material Maker will use it.
There are very few generator types:
- shader-based generators. All resolution independant generators in Material Maker are of this type (all shape, pattern, filters, transforms...).
- the buffer generator, that renders its input into a texture and provides the result to generators that ae connected to its output
- the switch, that redirects selected inputs to its outputs
- the Material node that renders its inputs and combines them into a material
When shader-based generators are connected, Material Maker will combine their code into a new one. This is why each shader generator consists of:
- Global functions: this is code that can be (nearly) copied from Shadertoy and that provides the core functions of the generator. When combining shaders, Material Maker will always include this code only once.
- Instance functions: those are function that depend on the generator parameters and call global functions. Those functions are included once per generator instance when combining shaders. This is generally used to simplify the main code of complex shader generators.
- Main code: this code will be included in the main combined shader function, for each UV coordinates it is sampled with. This is optional but can be used to define common code for several outputs (and optimize the combined shader).
- Outputs: this is where the code for outputs (used where needed in the combined shader) is defined.
Creating a new custom generator
If you want to create the new generator from scratch, just drag and drop a Custom Shader node from the library pane to the graph (you can enter "custom" in the filter below the library pane to spot it easily). If you want to start from an existing one, just select a node in the graph and use the Tools -> Make selected nodes editable menu (or hit Ctrl-F).
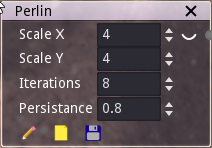
In both cases, 3 buttons will be shown on the node:
- A pencil-shaped button that shows the shader editor window
- A folder-like button to load an existing shader generator
- A floppy disk button to save the generator
Saving the shader generator into the generators directory in the Material Maker install location will make it available in the Tools -> Create submenu. Of course, overwriting a generator that was provided in Material Maker is generally a bad idea and may break generators that use it in the library and all material projects.
Defining the generator's interface
The generator will always have outputs that will be connected to the inputs of other generators. It may also (and will probably) have parameters that can be modified in the user interface, and inputs to receive data from other generators.
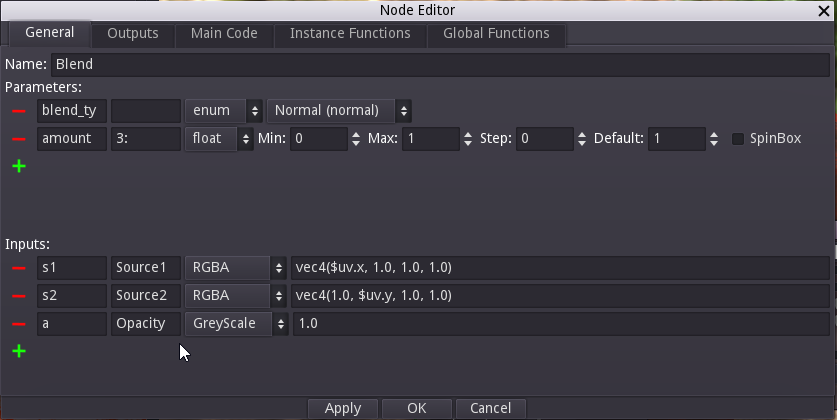
Inputs and parameters can be added in the General tab, but first, you may want to choose a nice name for your generator.
Parameters
To add a parameter, just click on the green "+" button in the Parameters section. A new parameter line will be created with a red "-" button on its left to delete the parameter. On this line:
- the first text field is the name of the parameter, that will be used in the shader code
- the second text field is an optional label that will be displayed in the user interface. There are a few tricks with this label that can help tweaking the UI, but let's focus on our first shader generator for now.
- the option button can be used to select a type for the parameter. The available types are float, size, enum, boolean, color and gradient
- on the right of the type selector, controls can be used to define a default value and constraints for the parameter
To use a parameter in your shader code it is necessary to prefix it with a dollar sign. So a foo parameter can be refered to by $foo or $(foo) in the shader code. Gradient parameters need to be used as functions with a single float parameter. So mygradient should be refered to as $mygradient($uv.x) if you want to spread the gradient on the x axis. And yes, $uv is an implicit variable used by Material Maker for UV coordinates.
Inputs
Inputs can be added and removed, have a name and a label (but no label trick) just like parameters. they also have a type that can be Greyscale, Color or RGBA. Please note that Material Maker will convert automatically if you connect an input to an output of a different type.
On the right of the input type, you must define a default value that will be used if the input is not connected. The default value is a GLSL expression that must evaluate to a float for Greyscale, a vec3 for Color or a vec4 for RGBA. Inputs default values can use the $uv implicit variable. You may want to define interesting default inputs for your generators, so it is possible to see their effect without connecting the inputs (the screenshot above is the Blend filter and has a vertical and an horizontal gradient as inputs).
In shader code, inputs are used as functions that take a single vec2 parameter. For example $myinput(2.0*$uv+vec2(0.2, 0.3)) refers to myinput, scaled and translated.
Outputs
Outputs are defined in the Outputs tab and are very similar to inputs, but instead of a default value, the generated value of the output should be specified as a GLSL expression (float for Greyscale, a vec3 for Color or a vec4 for RGBA). This expression can use everything in the generator (parameters, inputs, main code, instance functions and global functions) except other outputs. And generally, complex generators mean complex output expressions. You may thus want to write simple expressions in the Outputs tab and keep complex code in the 3 remaining tabs.

Adding the actual GLSL code
Now the parameters, inputs and outputs are defined, the code that will actually generate the texture will be in the 3 remaining tabs.
Global functions
The Global functions tab is used to define the functions that are necessary to implement the texture generator. Those functions will be included only once (when the generator is used of course) and cannot use parameters or inputs. This is typically where you will paste the code you prepared in Shadertoy.
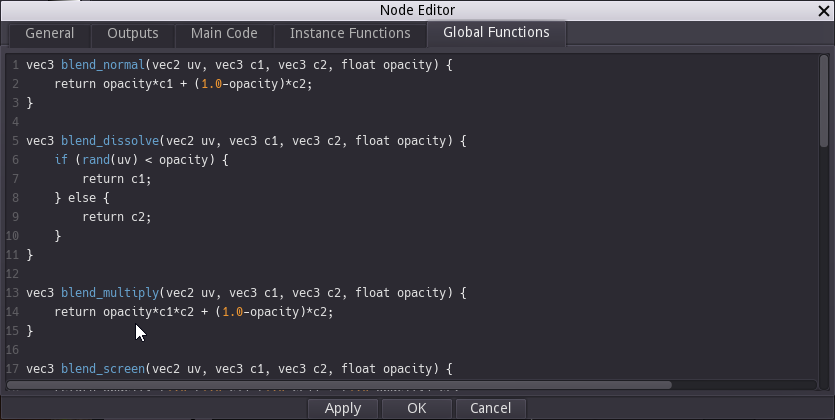
Instance functions
Instance functions are functions that are unique to an instance of the generator. They will typically depend on parameters, and those could either be used as parameters when calling global functions, or to form global function names (as shown in the screenshot below: the blend_type parameter is an enum whose value is the suffix of one of the blend functions defined in the Global Functions pane).
Instance functions must also have a unique name, and the name implicit variable can be used to do this: whenever $name or $(name) is used, it will be replaced with a unique name that depends on the generator instance.

Main code
This tab contains code that will be inserted into the main combined shader and can be used to define variables that will be used in the outputs expressions. This can be useful either to simplify the outputs or to define variables that will be used by several outputs (hence optimizing the shader code).
Main code can use the generator's parameters and inputs as well as instance and global functions.
Since a generator can be sampled for several different UV expressions in the same combined shader, it is necessary for all variables declared in the main code section to have a unique name for each (generator instance, UV expression) pair. Material Maker provides the name_uv implicit variable for this.

Have fun !
I hope this small guide will help those who want to create new shader-based generators for Material Maker. Unfortunately, there is no debug tool for now, so you may want to start with very simple shaders and read the code of existing ones. And please don't hesitate to post comments below to ask questions or report problems.
Leave a comment
Log in with itch.io to leave a comment.