3D model painting alpha release
The next release of Material Maker will have an exciting (at least it is for me) new feature that makes it possible to paint 3D models.
This release should be available before the end of the year, but I wanted to share a technology preview sooner to get feedback (and fix as many problems as possible before release). And "sooner" is now!
The tech preview can be downloaded (both Windows and linux versions are attached to this devlog) on itch.io. If you find bugs or have feedback, questions or ideas for future releases, please don't hesitate to use the comments section below.
Painting tools have quite a few limitations:
- the model must be provided in .OBJ format and have a single submesh (and of course, the mesh must have UVs)
- the tool can paint textures up to 2048x2048 smoothly, my poor NVidia 660 struggles painting 4096x4096 textures (I didn't test with higher end/more recent GPUs yet)
- there are only a few brushes to show what's possible ; creating and sharing new brushes is easy, so if you need a specific brushes, please feel free to ask, and if you create cool brushes, please don't hesitate to share them
- there is no documentation yet, but all you need should be described below
Creating a paint project
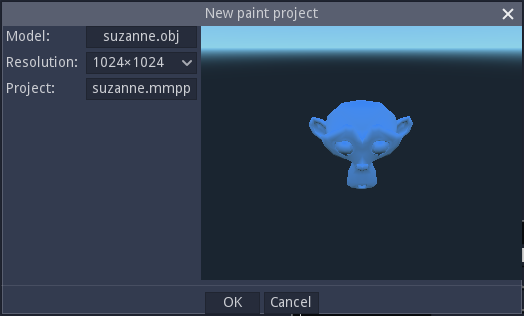
To start painting in Material Maker, just use the File -> New paint project menu. This will show a dialog where a model file and a texture size can be specified.

I recommend that you don't choose 4096x4096 of you have a low end GPU, but if you feel like trying, please don't hesitate to tell me how it works. When picking a .obj file, a paint project output file name and location will be chosen for you, but you can modify it if you wish.
Painting related panels
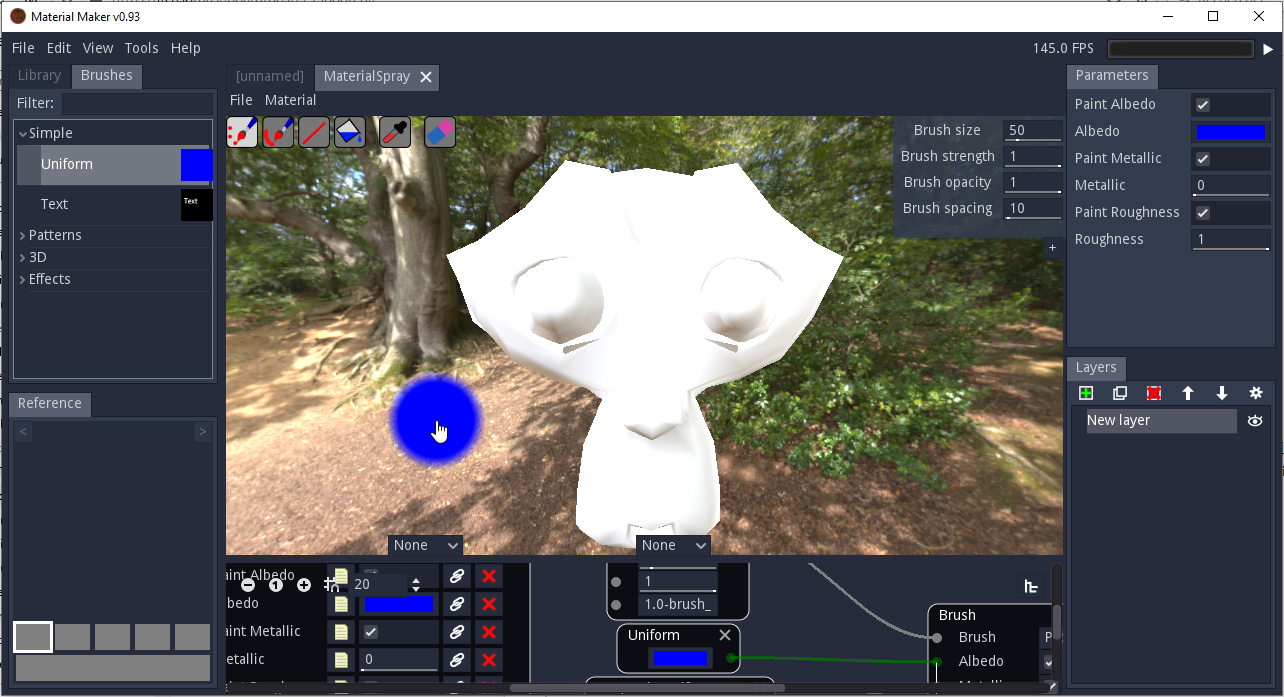
When the paint project is created, Material maker will show new panels:
- the Paint panel in the center, that shows the model to be painted and the graph that describes the current brush
- the Brush panel (top left) that shows the available brushes
- the Parameters panel that shows the brush parameters
- the Layers panel that shows the painting layers

Main paint panel
The paint panel shows the model and can be used to paint it.
The model can be rotated by holding the middle mouse button and translated by holding the middle mouse button and the Shift key.
The left mouse button (with no modifier) can be used to paint. Holding the Shift key and the left mouse button will modify the brush size (left - right) and hardness (up - down). Holding the Control key and the left mouse button will modify the pattern size and orientation (more about brushes and brush types below). Holding the Control key will also show the patten on the whole view (which can be useful with Pattern and UV pattern brushes).
The top left buttons are painting modes (freehand dots, freehand line, line, fill) that can be selected using the F1-F4 keys (beware, F4 fills right away and does not change mode). The color picking tool does not work yet. The Eraser can be toggled using the E key and used with all painting modes. Filling with the eraser enables will generally clean the layer (but the behavior could be different depending on the brush).
The bottom part of the panel shows the Brush graph. Creating a new brush is described below.
Brushes panel
This panel just contains brushes that can be used to paint the model. To activate a brush, just double click on it. There are very few brushes available for now, but they show what can be done with procedural brushes:
- Simple/Uniform: a basic brush that paint albedo, metallic and roughness channels with uniform color/values
- Simple/Text: a brush that draws text
- Patterns/Screws: a brush that draws configurable screws. To be used in Line mode to create rows of screws
- Patterns/Arrows: a brush that draws arrows aligned to the stroke. This brush should be used with Freehand Dots mode with correct brush spacing.
- 3D/Snow: a brush that paints snow on top of the model. Using it with the Fill mode will draw snow wherever possible.
- 3D/Wood: a 3D wood brush (angle and offset can be configured in the Parameters panel)
- 3D/RustyIron: a 3D rusty iron brush
- Effects/GreyScale: a brush thatremoves color from the layer
- Effects/Blur: a brush that blurs the layer
- Effects/Dribble: a brush that simulates a liquid flowing to the bottom of the model
Parameters panel
This panel can be used to modify the brush parameters.
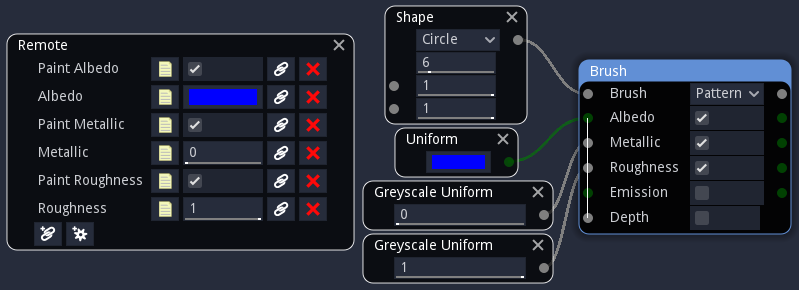
When creating a brush, adding a Remote node makes it possibel to add parameters to that panel.
Layers panel
The layers panel can be used to create, duplicate, remove and reorder layers. Transparency can also be defined for each channel of each layer.
Creating brushes
Brushes are described in the graph subpanel in the main painting panel.

The Brush node accepts the following inputs:
- Brush is a greyscale input that defines the shape of the brush: white pixels are painted, black pixels are not and grey values are used as alpha. The Brush input is implicitely modified using the Brush hardness and the Brush opacity parameters.
- Albedo, Metallic, Roughness, Emission and Depth defines the patterns painted on the corresponding channels. Albedo have their own alpha channel (that is multiplied by the Brush alpha).
Brushes have a parameter that define how the channel patterns are mapped:
- in Stamp mode, the pattern is mapped on the brush
- in Pattern mode, the pattern is mapped on the screen
- in UV Pattern mode, it is mapped on the texture. This is the most flexible mode as it can be used to apply 3D textures or effects that depend on the mesh geometry.
The boolean parameters of the Brush node can be used to enable painting of each channel.
If you create nice new brushes, you can save them to the user brush library using the Tools->Add current brush to the user library menu entry.
To share brushes, just select the whole graph and copy it with Control+C, then paste it as text anywhere you want (text file, email, pastebin).
To use a shared brush, remove all nodes from the brush graph, copy the text for the brush, and paste it into the graph.
Files
Get Material Maker
Material Maker
Procedural textures authoring tool
| Status | In development |
| Category | Tool |
| Author | RodZilla |
| Tags | designer, godot-engine, material, PBR (Physically Based Rendering), Procedural Generation, substance, Textures |
| Languages | English |
More posts
- I need your help (just 2 clicks)57 days ago
- Material Maker 1.469 days ago
- Material Maker 1.4RC683 days ago
- Material Maker 1.4RC5Aug 25, 2025
- Material Maker 1.4RC4Aug 07, 2025
- Material Maker 1.4RC3Jul 30, 2025
- Material Maker 1.4RC2Jul 12, 2025
- Material Maker 1.4 RC1Jul 03, 2025
- A third beta for 1.4Jun 11, 2025
- Material Maker 1.4b2May 09, 2025

Leave a comment
Log in with itch.io to leave a comment.